As an Amazon Associate, I earn from qualifying purchases. This comes at no extra cost to you and helps keep this site running.
Drone footage changed wildlife photography forever. Perspectives that used to require a helicopter, a long expedition, or a lot of luck are now accessible to anyone willing to fly smart.
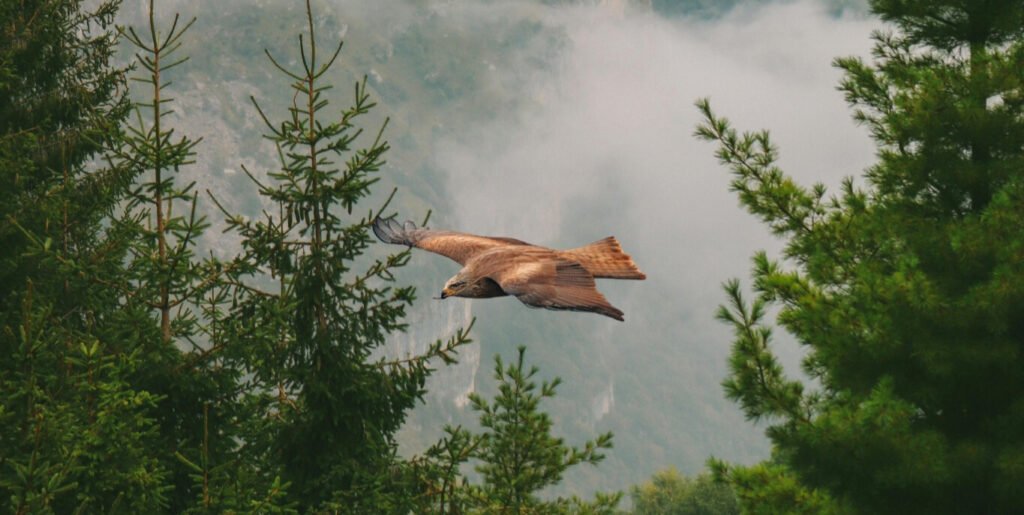
A humpback whale breaching from 80 meters up. Zebras moving across the savanna, their stripes forming patterns you can only see from altitude. An eagle in a thermal, shot from the same height it’s flying. These aren’t magazine covers anymore — they’re what a patient drone pilot can get on a Tuesday.
But the same capabilities that make drones incredible for wildlife photography also make it easy to cause real harm if you’re not careful. This guide covers how to shoot it well — and how to do it without becoming a problem for the animals you’re there to photograph.
What Drones Actually Change for Wildlife Photography
Traditional wildlife photography is ground-level, constrained by terrain, and often dependent on how close you can physically get. Drones remove most of those limits.
You can observe animals in their habitat without being physically present in it. You can follow movement without creating ground-level disturbance. You can shoot from angles that reveal behavior — herd dynamics, migration patterns, feeding habits — that’s invisible at eye level.
Sub-250g drones are particularly well-suited to this. They’re quieter, smaller, and visually less threatening than larger craft. A DJI Mini 4K at altitude looks like a large insect to most animals — far less alarming than a person on foot.
The key is reading the animal’s response. The drone’s distance from the animal matters less than the animal’s reaction to the drone.
The Ethics: Five Rules That Actually Matter
- 1 Research before you fly. Know the species, their breeding season, and what triggers stress behavior. Flying near a nesting raptor in breeding season is a very different situation than flying near a grazing herd in a field. Preparation prevents the most common mistakes.
- 2 Watch behavior, not distance. There’s no universal safe distance. Some animals are habituated to drones; others spook at 200 meters. Use behavior as your guide — if an animal changes what it’s doing because of you, you’re already too close.
- 3 Stay away from nesting sites and breeding grounds. These are the highest-sensitivity areas. Even a short disturbance during nesting can cause a bird to abandon eggs or a den. No shot is worth that. Give these areas a wide berth, always.
- 4 Avoid feeding times and rest periods. An animal interrupted during feeding or sleep is an animal that’s burning energy it needs. Early morning and late evening are active periods — good for photography, but manage your timing carefully so you’re observing activity, not creating stress.
- 5 Know the local regulations before you go. Many national parks ban drones outright. Some protected species have legally mandated buffer distances. FAA rules apply everywhere in the US, and local rules layer on top. Check both before you fly — not after. Our first-flight guide covers the regulatory basics →
National Parks: Drone use is banned in most US national parks without a specific permit. State parks vary widely. International locations have their own rules. If you’re planning a trip specifically for wildlife drone photography, check park policies before booking — not after you arrive.
What to Look for in a Wildlife Drone
Not every drone is suited for wildlife work. These are the features that actually matter:
Two Drones Worth Considering
DJI Mini 4K
The 3-axis mechanical gimbal is the headline — smooth, stable footage regardless of wind or movement. At 246g, it’s sub-250g (no FAA registration for rec use) and noticeably quieter than larger DJI craft. 10km OcuSync transmission means reliable signal even at distance. QuickShots make cinematic sequences easier. The best all-around option if footage quality is the priority.
→ Check DJI Mini 4K price on AmazonPotensic ATOM SE
Sony CMOS sensor, Follow Me, Orbit, and Waypoints — all under $250. Follow Me mode (tracks your phone’s GPS) works well for subjects moving in a predictable direction: hiking wildlife, slow-moving herds, coastal birds in flight. No mechanical gimbal, so best in calm conditions. The Fly More bundle at ~$299 is excellent value for extended sessions. Read our full ATOM SE review →
→ Check Potensic ATOM SE price on AmazonNot sure which fits your budget? See our best drones under $300 and best drones under $500 guides for the full picture.
Practical Tips for Better Wildlife Shots
Approach slowly and from altitude first. Don’t fly straight at an animal at eye level. Come in high, reduce altitude gradually, and watch for behavioral changes at each step. If the animal reacts, hold position or pull back — don’t push through.
Use Waypoints or pre-planned routes near sensitive areas. Flying a consistent, predictable path is less alarming to animals than erratic manual movement. Plan the route before you get close to the subject.
Shoot in shorter sessions. Multiple short flights are less disruptive than one long one. Give animals time to settle between sessions. Patience produces better shots and causes less stress.
Position yourself downwind. Sound travels with the wind. Launching from downwind of your subject means the drone’s noise is carried away from the animal, not toward it.
Frequently Asked Questions
How close can I fly a drone to wildlife?
No universal rule exists — it depends on the species, habitat, and situation. A practical baseline is 50–100 meters for most land animals, and further for birds near nesting sites. Watch behavior, not distance. If an animal is changing what it’s doing because of your drone, you’re already too close.
Are drones allowed in national parks for wildlife photography?
In most US national parks, no — drone use requires a specific permit, and recreational use is generally prohibited. State parks vary widely. Always check the park’s specific rules before going, not after you arrive. FAA airspace rules also apply on top of park regulations.
What is the best drone for wildlife photography?
Sub-250g drones like the DJI Mini 4K are popular for wildlife work — quieter, less threatening to animals, and no FAA registration for recreational use. Key features: quiet motors, a stabilized camera, long battery life, and subject tracking if you want to follow moving animals. See our Mini 4K vs ATOM SE comparison for more.
What time of day is best for wildlife drone photography?
Golden hour — first hour after sunrise, last before sunset. The light is warm and directional, and animals are usually more active at dawn and dusk. Avoid midday when harsh light flattens everything and animals are often resting.
The bottom line: Drone wildlife photography rewards patience and preparation more than any other type. The best shots come from knowing your subject, reading its behavior, and giving it the space it needs. Fly ethically, and the access drones give you is genuinely extraordinary.
Keep Reading
Last updated: June 2026. Regulations change — always verify current FAA and park rules before flying in wildlife areas.